Netflow on Nexus 1000v
This is a guest diary submitted by Basil Alawi.
What is NetFlow?
NetFlow is a traffic-summarization format that was first implemented by Cisco Systems, primarily for billing purposes. Network flow data (or Network flow) is a generalization of NetFlow.
Network flow collection differs from direct packet capture, such as tcpdump, in that it builds a summary of communications between sources and destinations on a network. This summary covers all traffic matching seven particular keys that are relevant for addressing: the source and destination IP addresses, the source and destination ports, the protocol type, the type of service, and the interface on the router[i].
SiLK
SiLK is a suite of network traffic collection and analysis tools developed and maintained by the CERT Network Situational Awareness Team (CERT NetSA) at Carnegie Mellon University to facilitate security analysis of large networks. The SiLK tool suite supports the efficient collection, storage, and analysis of network flow data, enabling network security analysts to rapidly query large historical traffic data sets[ii].
Netflow on VMware ESXi:
NetFlow is available in vSphere distributed switch version 5 or later as well as in Cisco Nexus 1000v. VMware vSphere 5 supports NetFlow v5 while Cisco Nexus 1000v support Netflow v5 as well as Netflow v9.
Running netflow on a vSphere environment will provide visibility of the following:
· Intrahost virtual machine traffic (virtual machine–to–virtual machine traffic on the same host)
· Interhost virtual machine traffic (virtual machine–to–virtual machine traffic on different hosts)
· Virtual machine to physical infrastructure traffic
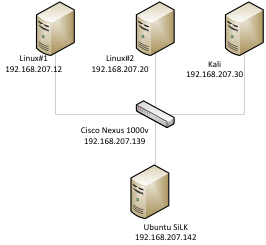
Test Lab
The test lab consist of Vmware ESXi 5.1 as a host ,Ubuntu 13.04 as netflow collector and analysis workstation , Kali Linux with an IP of 192.168.207.30 , Linux#1 server with an IP 192.168.207.12 , Linux#2 with an IP of 192.168.207 and Cisco Nexus 1000v switch with an IP of 192.168.207.139.
SiLK Installation
For this diary the SiLK will be running on a fresh Ubuntu 13.04 installation. Here is a step by step instruction on how to install SiLK on Ubuntu Linux.
1-Install gcc , gcc-c++, glib2, glib2-devel, libpcap, libpcap-devel, python and python-devel
|
sudo apt-get -y install libglib2.0-dev |
2-Download Silk and fixbuf. Latest version can be found at http://tools.netsa.cert.org/
|
wget http://tools.netsa.cert.org/releases/silk-3.7.2.tar.gz wget http://tools.netsa.cert.org/releases/yaf-2.4.0.tar.gz wget http://tools.netsa.cert.org/releases/libfixbuf-1.2.0.tar.gz |
3-Install fixbuf
|
tar -zxvf libfixbuf-1.2.0.tar.gz cd libfixbuf-1.2.0/ ./configure
make |
3-Install Yaf
|
tar -zxvf yaf-2.4.0.tar.gz cd yaf-2.4.0 export PKG_CONFIG_PATH=/usr/local/lib/pkgconfig ./configure make sudo make install |
4-Install SiLK
|
tar -xvzf silk-3.7.2.tar.gz |
5- Add the following paths to ld.so.conf
|
|
6- Run ldconfig
|
sudo ldconfig |
7-Create /data directory
|
sudo mkdir /data |
8- Configure rwflowpack
|
cat /usr/local/share/silk/etc/rwflowpack.conf | \ |
9- copy the startup script into /etc/init.d and set it to start on boot.
|
sudo cp /usr/local/share/silk/etc/init.d/rwflowpack /etc/init.d |
SiLK configuration:
1-Create and configure the /data/silk.conf file. You can use the below text, replace the word Nexus with your netflow enabled device.
|
sensor 0 Nexus
class all sensors Nexus end class
# Be sure you understand the workings of the packing system before # editing the class and type definitions below. Editing above this # line is sufficient for sensor definition.
version 1
class all type 0 in in type 1 out out type 2 inweb iw type 3 outweb ow type 4 innull innull type 5 outnull outnull type 6 int2int int2int type 7 ext2ext ext2ext type 8 inicmp inicmp type 9 outicmp outicmp type 10 other other
default-types in inweb inicmp end class
default-class all
# The default path format from SILK_DATA_ROOTDIR path-format "%N/%T/%Y/%m/%d/%x"
# The plug-in to load to get the packing logic to use in rwflowpack. # The --packing-logic switch to rwflowpack will override this value. # If SiLK was configured with hard-coded packing logic, this value is # ignored.
# The plug-in to load to get the packing logic to use in rwflowpack. # The --packing-logic switch to rwflowpack will override this value. # If SiLK was configured with hard-coded packing logic, this value is # ignored. packing-logic "packlogic-twoway.so" |
2-create and configure the sensor.conf file
|
probe Nexus netflow-v9 listen-on-port 9901# SiLK will receive netflow traffic on this port number protocol udp accept-from-host 192.168.207.139 #Nexus 1000v management IP address end probe sensor Nexus netflow-v9-probes Nexus internal-ipblock 192.168.207.0/24 external-ipblock remainder end sensor |
3-Allow traffic from udp port 9901 from the Nexus Management port
|
sudo iptables -I INPUT -s 172.16.1.3 -p udp -m udp --dport 9901 -j ACCEPT sudo iptables-save |
4-Start the rwflowpack
|
sudo service rwflowpack start |
Nexus Cisco 1000v
I am not going to discuss the installation of Nexus Cisco 1000v in this diary; a step by step guide is available at http://www.cisco.com/en/US/docs/switches/datacenter/nexus1000/sw/4_2_1_s_v_2_2_1/install_upgrade/guide/b_Installation_and_Upgrade_Release_4_2_1SV2_2_1_series_release.html
Nexus Cisco 1000v Configuration
Cisco Nexus 1000v:
Here is the steps to configure
1-Enable netflow
|
Config t feature netflow |
2-Configure the exporter
|
flow exporter ExortSilk description Export Silk destination 192.168.207.140 transport udp 9901 source mgmt0 version 9
|
3-configure the flow monitor
|
flow monitor NexusMonitor record netflow-original exporter ExportSilk |
4-Assigning the Flow Monitor to an Interface
|
int vethernet 1 ip flow monitor NexusMonitor output |
SiLK Commands:
Here is a very brief description of some SiLK commands:
rwfilter [1] :
rwfilter is the most used command in the SiLK suite. It serves as the starting point for most
Analyses.
rwcut[2] :
rwcut Print selected fields of binary SiLK Flow records and prints the records to the screen in a textual, bar (|) delimited format .rwcut can take input piped from rwfilter command.
rwstat [3] :
rwstats - Print top-N or bottom-N lists or summarize data by protocol , rwstats has two modes of operation: it can compute a Top-N or Bottom-N list, or it can summarize data for a list of protocols.
SiLK Usage:
Here are some examples of SiLK usage:
1-Finding the top talkers
|
rwfilter --sensor=Nexus --protocol=6 --pass=stdout | rwstats --fields sIP,dIP --count=10 --bytes |
In this example rwfilter will read data from Nexus sensor, --protocol switch is the IP protocol number[4] ,the most common used protocols are icmp=1,tcp=6 and udp=17 ,0-255 means select all possible IP protocols ,. The --protocol switch is a partitioning switch, --pass=stdout will Send SiLK flow records matching partitioning parameters to pipe . By default the output of rwfilter is in binary format not in ascii format. The rwstats will compute the Top-N list, the –fields sIP,dIP will display source IP address and destination IP address ,--count=10 will choose the top 10 and –bytes will choose the top 10 based on the bytes value.
2-Filttering traffic based on port number
|
rwfilter --sensor=Router --aport=123 --pass=stdout| rwuniq --fields 1 |
|
sIP| Records| 72.232.197.50| 10| 63.246.147.180| 10| 63.246.147.170| 9| 72.232.188.10| 8| 72.232.188.26| 18| |
In this example rwfilter will read data from Nexus sensor,--protocol=17 will select UDP flow records,---aport=123 will filter traffic based on port number 123 which is NTP port . rwuniq[5] will summarize SiLK Flow records by a user-specified key comprised of record attributes ,
--fields sIP will display the source IP address.
3-Finding traffic with outside world:
|
rwfilter --sensor=Nexus --saddress=192.168.207.0/24 --daddress=192.168.207.0/24 --fail=stdout | rwuniq –fields 1-4 |
|
sIP| dIP|sPort|dPort| Records| 147.52.159.12| 192.168.207.30| 80|37840| 2| 147.52.159.12| 192.168.207.30| 80|52135| 2| 173.194.35.110| 192.168.207.30| 80|37311| 2| 147.52.159.12| 192.168.207.30| 80|37975| 2| 147.52.159.12| 192.168.207.30| 80|37557| 1| 178.236.7.67| 192.168.207.30| 80|34630| 3| 173.194.35.105| 192.168.207.30| 80|53842| 2| 182.50.136.239| 192.168.207.10| 80|47031| 2| 173.194.35.102| 192.168.207.30| 80|59682| 2| 173.194.35.111| 192.168.207.30| 443|50579| 3| 109.63.48.74| 192.168.207.10| 80|48185| 2|
|
In this example rwfilter will write all the records that doesn’t have both source and destination IP address within the 192.168.20.0 range.
4- Finding all the traffic the exceed a certain size
|
rwfilter --sensor=Nexus --proto=0-255 -bytes=10000000- --pass=stdout |rwcut |
|
sIP| dIP|sPort|dPort|pro| packets| bytes| flags| sTime| duration| eTime|sensor| 147.52.159.12| 192.168.207.30| 80|37565| 6| 11526| 16130997| |2013/09/17T17:48:00.241| 241.447|2013/09/17T17:52:01.688|Nexus| 147.52.159.12| 192.168.207.30| 80|37565| 6| 11489| 15807248| |
In this example rwfilter will pass all of the records that have 10000 bytes or more. The hyphen symbol (-) is more or equal.
[1] http://tools.netsa.cert.org/silk/rwfilter.html
[2] http://tools.netsa.cert.org/silk/rwcut.html
[3] http://tools.netsa.cert.org/silk/rwstats.html
[5] http://tools.netsa.cert.org/silk/rwuniq.html
[i] http://tools.netsa.cert.org/silk/faq.html#what-is-flow


Comments
You may want to consider open-source FlowViewer for a robust web-based front-end to SiLK
See: http://sourceforge.net/projects/flowviewer/
Anonymous
Oct 24th 2013
1 decade ago