Submitting pfSense Firewall Logs to DShield
In my previous diaries, I wrote about pfSense firewalls [1], [2]. I hope the diaries have given some insight to current pfSense users, and also inspire individuals who have yet to deploy any form of information security mechanisms in their homes/personal networks to do so. At the SANS Internet Storm Center, we welcome interested participants to submit firewall logs to DShield [3]. In this diary entry, I would like to share how to do so if you are using a pfSense firewall. I also highlight some minor issues I discovered when I was trying set up the DShield pfSense client, and how to resolve them so you can send your logs to DShield successfully. Please remember to do a config backup on your pfSense firewall before changing anything, and test the changes made in a test network before deploying them into the production environment. At this point of writing, all configuration and testing were done on pfSense 2.5.0-RELEASE Community Edition.
1) Configure pfSense E-Mail Settings
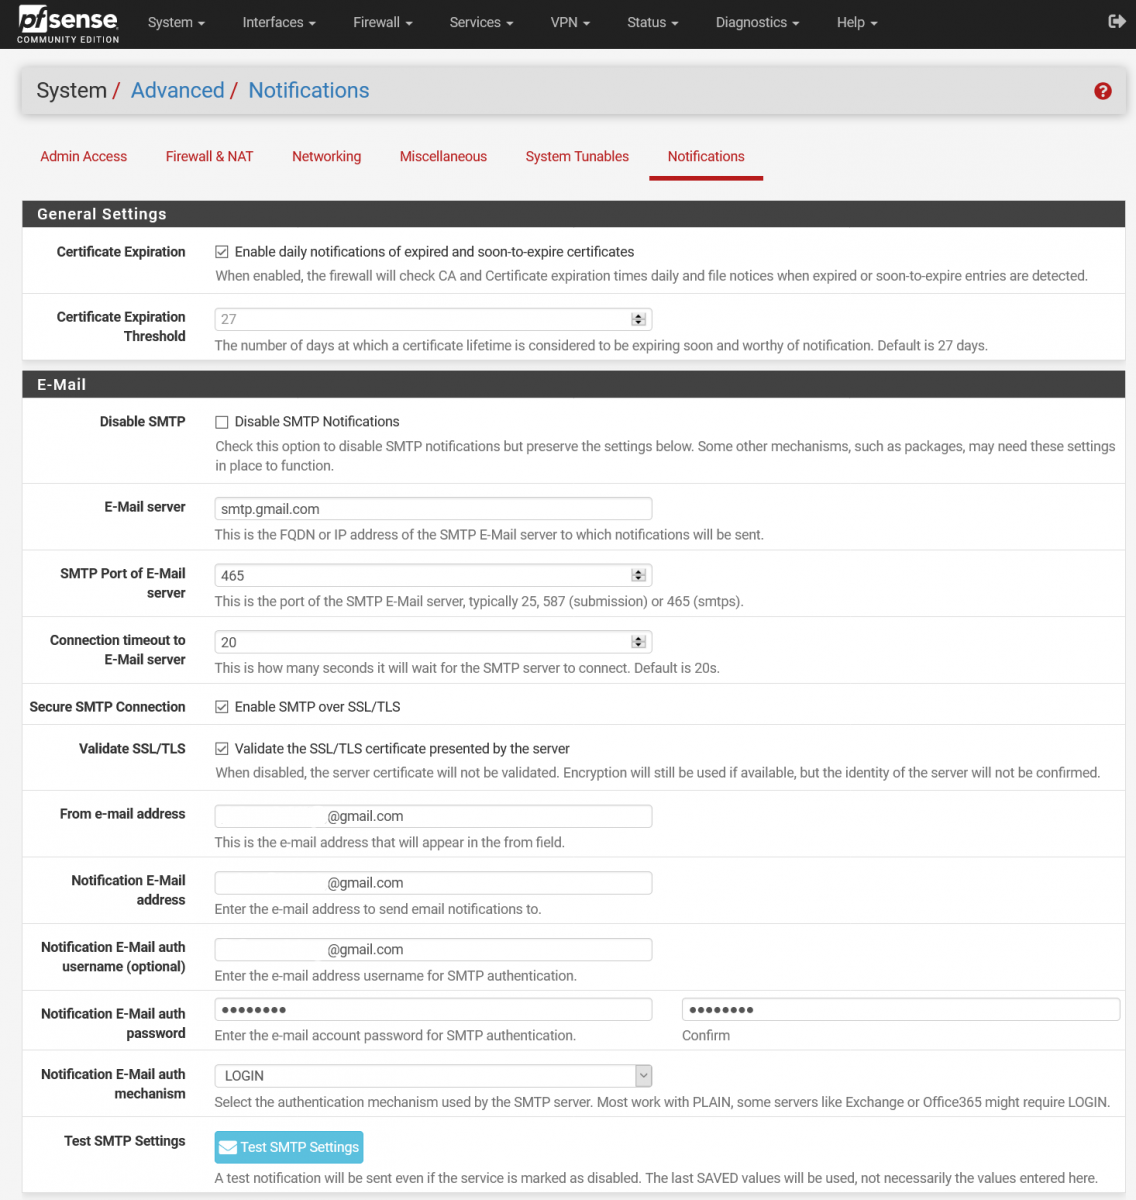
E-Mail settings inside the pfSense Notifications menu have to be enabled if you want to submit your pfSense firewall logs to DShield. To navigate to the appropriate settings page, please go to “System > Advanced > Notifications”. Figure 1 shows the corresponding screenshot, and also some sample settings if you are using Google Mail. When the corresponding details have been added, scroll down and select “Save” first. After that, click on “Test SMTP Settings” and see if you received the test e-mail. Please use the e-mail address that you have registered with the SANS Internet Storm Center.

Figure 1: SMTP Settings on pfSense (Google Mail is being used here)
Note: You have to save the details before testing the SMTP settings. There is currently a bug in pfSense that loads the wrong password if you test SMTP settings and subsequently save them [4].
If you are using Google Mail, you may get an error message about SMTP failure and that the test e-mail could not be sent. Following that, you may receive an e-mail from Google that a sign-in attempt was blocked. If you follow on the error code, it will lead to a Google Account Help page that states “Less secure app access” may have to be enabled as 2-step verification is not enabled. If you do get this, please enable 2-step verification, configure an App password to use for the E-Mail settings in pfSense, and then complete Google’s Display Unlock Captcha [5]. For a detailed explanation on how to configure an App password, it can be found here [6]. It is highly not recommended to enable less secure app access, and it is always a good security practice to use two-factor authentication (2FA) when logging in to your accounts.
2) Create a new directory to store DShield files
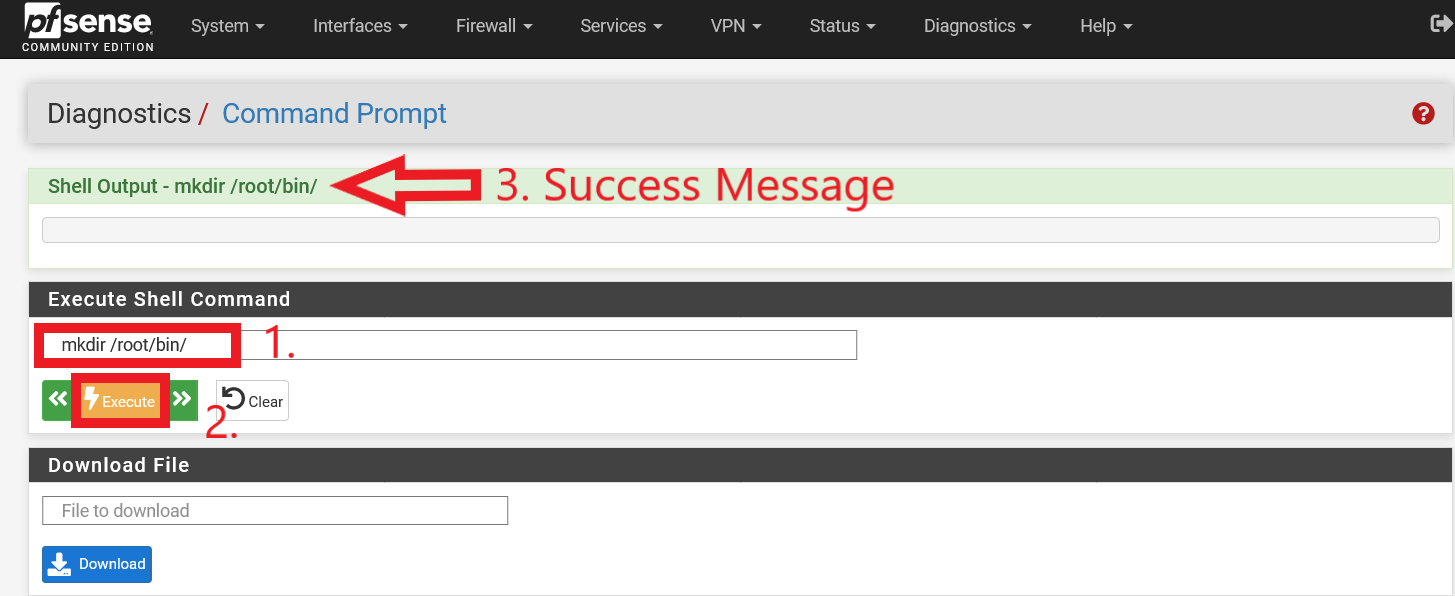
It was recommended that the DShield files to be put at a convenient directory (/root/bin/). In a default installation of pfSense, there is no /bin directory inside /root. As such, it has to be created manually. To do so, navigate over to the pfSense WebGUI Command Prompt. To go to the page, navigate to “Diagnostics > Command Prompt”. Type in the command mkdir /root/bin/ under the “Execute Shell Command” section. Figure 2 below shows successful execution of the command.

Figure 2: Creation of /root/bin/ directory
3) Download and edit DShield pfSense Client
It is now time to prepare 2 files that are required to be copied to your pfSense firewall – dshield.php and dshield.sample (dshield.sample will have to be renamed to dshield.ini after relevant details are filled in). They can be downloaded from Johannes Ullrich’s GitHub repository over here [7]. There are multiple ways of loading these 2 files into the firewall, such as via SSH, SCP or even via a direct curl command. However, since dshield.sample has to be modified and renamed before it can be used by dshield.php, I will be modifying the files locally on a computer before uploading them via pfSense WebGUI Command Prompt page (if you prefer to modify them directly on the firewall via SSH or direct interaction via the firewall, by all means. However, I personally prefer to finalize file edits before pushing them to the firewall). With reference to Figure 3, edit lines 4, 5 and 6 of dshield.sample with your SANS Internet Storm Center details (these can be found when you go to https://isc.sans.edu/myaccount.html. Please refer to Figure 4 to see the information required for Line 4 and Line 6). You will also need to edit line 13 and input the IP address that you are sending the firewall logs from (i.e. your public IP address). This is to prevent your IP address from being blocked/reported as an offender if some outgoing traffic is blocked within your network (e.g. NTP, or some other traffic due to security policies).

Figure 3: Details to be amended in dshield.sample (to be renamed to dshield.ini)

Figure 4: User ID # and API Key Details for dshield.sample (to be renamed to dshield.ini)
You will need to ensure that the interfaces name (Line 9) matches the alias name of your WAN interface (with reference to Figure 5, and this information can be retrieved at https://<yourpfsenseipaddress>/status_interfaces.php). By default, if it was not amended when pfSense was first installed, you should not need to amend Line 9 of dshield.sample.

Figure 5: WAN Name for Line 9 in dshield.sample (to be renamed to dshield.ini)
Finally, remember to rename dshield.sample to dshield.ini (do not forget this, or else dshield.php will not work).
4) Upload dshield.php and dshield.ini to your pfSense firewall
Finally, we can now upload dshield.php and dshield.ini into your pfSense firewall. We will use the pfSense WebGUI Command Prompt page to upload the 2 files. Under the “Upload File” section, browse to where dshield.php and dshield.ini was saved on your computer and select “Upload” (please refer to Figures 6 and 7).

Figure 6: dshield.php Uploaded to pfSense Firewall

Figure 7: dshield.ini Uploaded to pfSense Firewall
They will first end up in the /tmp directory. Type in the following commands (without quotes) “mv /tmp/dshield.ini /root/bin/“ and “mv /tmp/dshield.php /root/bin/” under the “Execute Shell Command” section of the pfSense WebGUI Command Prompt page to move them into the /root/bin/ directory (Figure 8 and 9 shows the commands being executed successfully).

Figure 8: Execution of command (without quotes) “mv /tmp/dshield.ini /root/bin/“

Figure 9: Execution of command (without quotes) “mv /tmp/dshield.php /root/bin/”
5) Make dshield.php executable, and add a Cron Job
We also have to make dshield.php executable. With reference to Figure 10, the command (without quotes) “chmod +x /root/bin/dshield.php” is executed.

Figure 10: Making dshield.php Executable
Finally, to ensure that firewall logs are regularly sent to DShield, a cron job for dshield.php has to be scheduled. There are a few ways to schedule such a job. For example, you could SSH into your pfSense firewall and run the command (without quotes) “crontab -e”, and add the line (without quotes) “11,41 * * * * /root/bin/dshield.php” (this means at 11th and 41st minute of the hour, dshield.php is executed). However, if we are strictly using the pfSense WebGUI Command Prompt, “crontab -e” would not work as the WebGUI Command Prompt does not support interactive sessions. As such, we will install the “Cron” package that is located under “System > Package Manager > Available Packages”. If you had previously installed the Cron package, this step can be skipped.

Figure 11: Installing pfSense Cron Package
After Cron is installed, it can be found under “Services > Cron” (please refer to Figure 12 for an illustration).

Figure 12: Location of pfSense Cron Menu Item
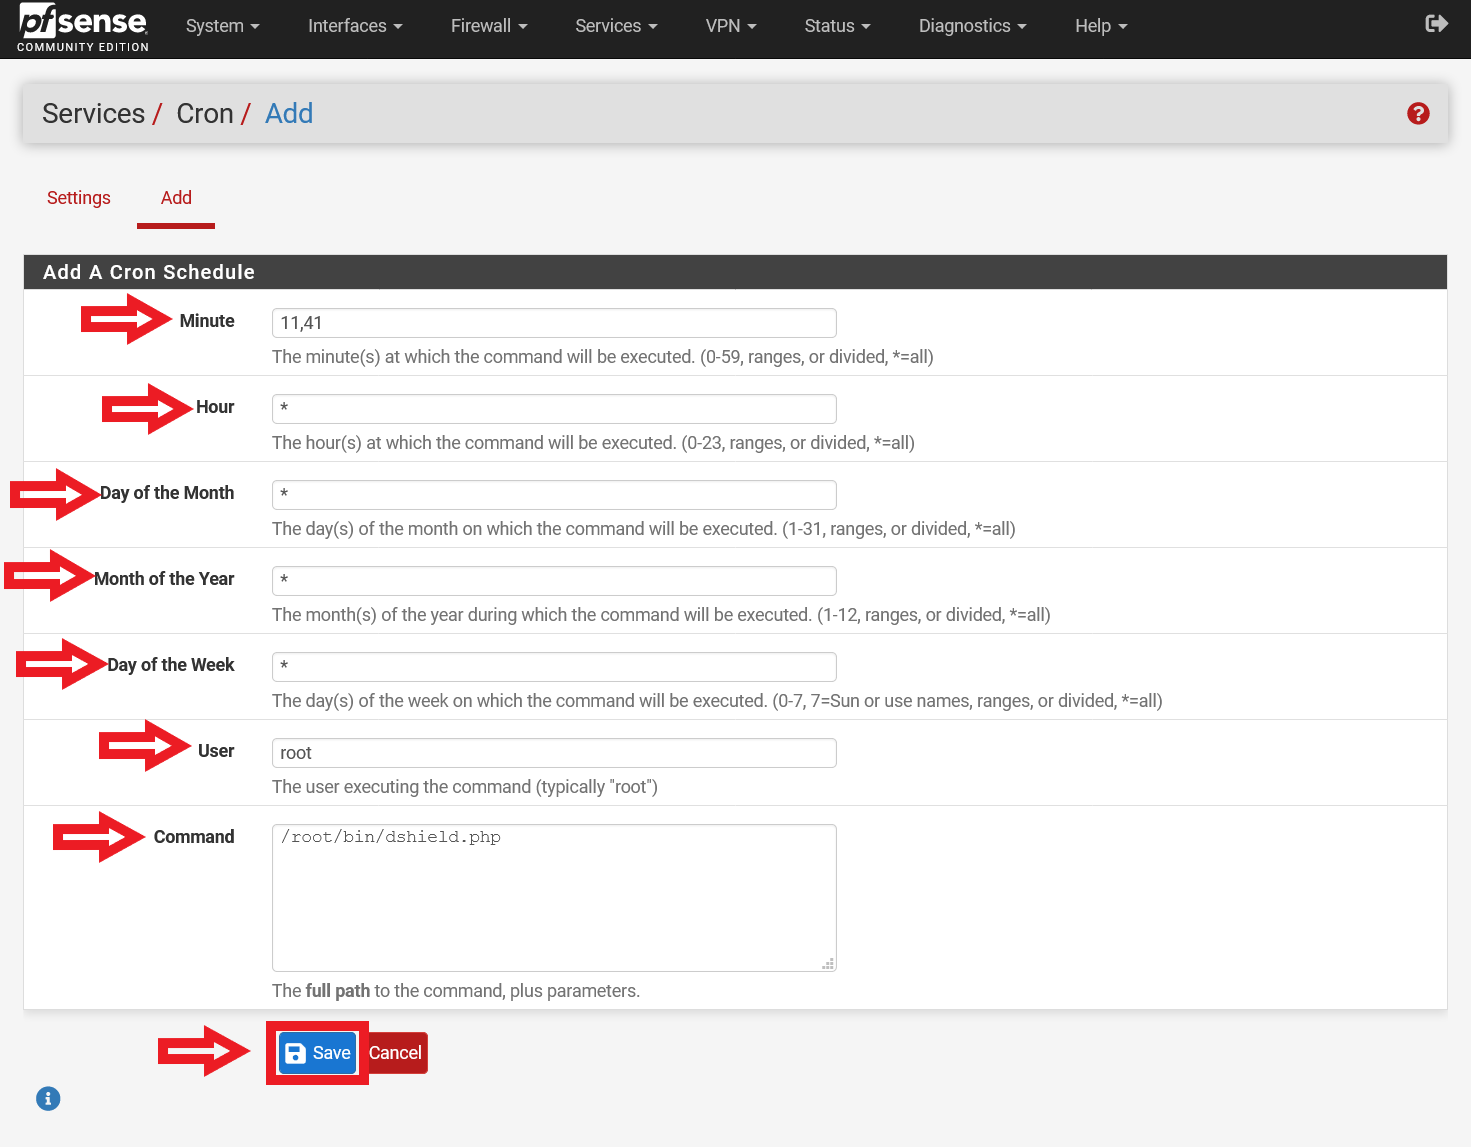
Select “Add”, and fill in the corresponding details (Please refer to Figure 13 for a screenshot of the configuration):
Minute – 11,41
Hour – *
Day of the Month – *
Month of the Year – *
Day of the Week – *
User – root
Command – /root/bin/dshield.php

Figure 13: Configuration of dshield.php Cron Job
6) Configuration complete, and test dshield.php
After all the configuration has been completed, run the command (without quotes) “/root/bin/dshield.php” in the pfSense WebGUI Command Prompt. With reference to Figure 14, it shows a successful execution of dshield.php.

Figure 14: Successful execution of dshield.php
After a few minutes (it may take a while at times), you will receive an acknowledgement from admin<at>dshield[.]org and a short summary of what was submitted to DShield. Alternatively, if you did not opt in to receive an acknowledgement e-mail after submitting your firewall logs, you can also navigate to the “My Reports” tab in your Internet Storm Center account to see the logs that you have submitted (in the last 30 days). The command (input the command without quotes) “cat /tmp/lastdshieldlog” can also be executed in the pfSense WebGUI Command Prompt to check the contents of firewall logs last submitted to the SANS Internet Storm Center.
With that, your pfSense firewall has been configured to regularly submit firewall logs to DShield. Registered users also can optionally enable Fightback in their account, and log reports will be forwarded to the Internet Service Provider (ISP) where the attack originated from after analysis [8]. All DShield data is consolidated over here [9], and will benefit users globally in protecting their networks from intrusion attempts.
References:
[1] https://isc.sans.edu/diary/26766
[2] https://isc.sans.edu/diary/27102
[3] https://isc.sans.edu/howto.html
[4] https://redmine.pfsense.org/issues/10325
[5] https://accounts.google.com/DisplayUnlockCaptcha
[6] https://support.google.com/accounts/answer/185833?hl=en
[7] https://github.com/jullrich/dshieldpfsense
[8] https://isc.sans.edu/fightback.html
[9] https://isc.sans.edu/reports.html
-----------
Yee Ching Tok, ISC Handler
Personal Site
Twitter


Comments