Windows 11 Snipping Tool Privacy Bug: Inspecting PNG Files
In today's Stormcast, Johannes discussed a privacy issue with Windows 11's snipping tool.
The issue is the following: if you use Windows 11's snipping tool to open an existing image, then modify the image to make it smaller (cropping for example), and then save the image again under the same name, then the file will not be truncated. The file will keep its original data after the beginning of the file has been overwritten with the new image.
I tested this with a PNG file on Windows 11, and could indeed reproduce the issue. The reason why this doesn't work on Windows 10, is that as far as I know, Windows 10's snipping tool can not open an existing file.
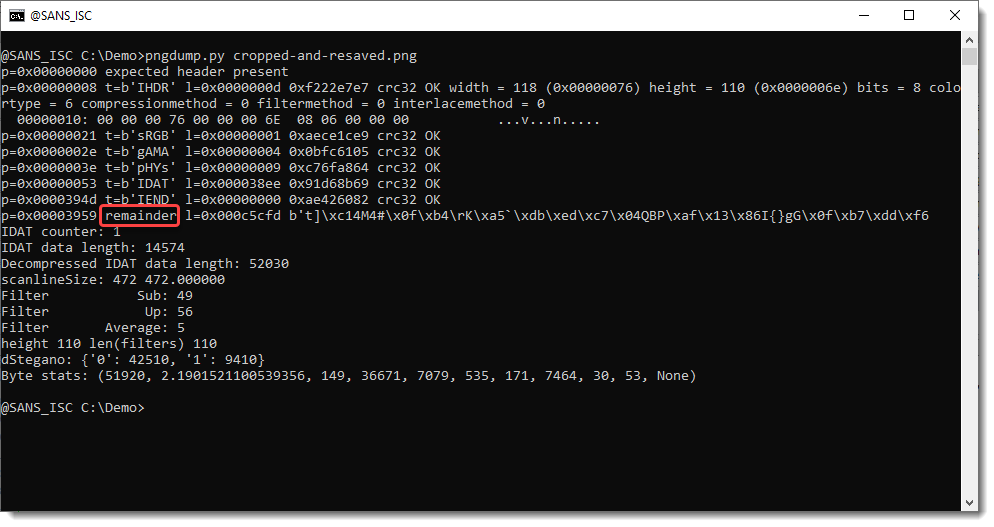
This data that wasn't truncated, can be easily detected with my pngdump.py tool:

A PNG file should end with an IEND chunk, and in this case, we see that my tool detects and reports data found after this chunk (remainder). This is the data from the original file, that is being leaked (it should have been removed).
I just added a new option to my pngdump.py tool, to search for known PNG chunks. In normal mode, my pngdump.py tool expects to parse a compliant PNG file.
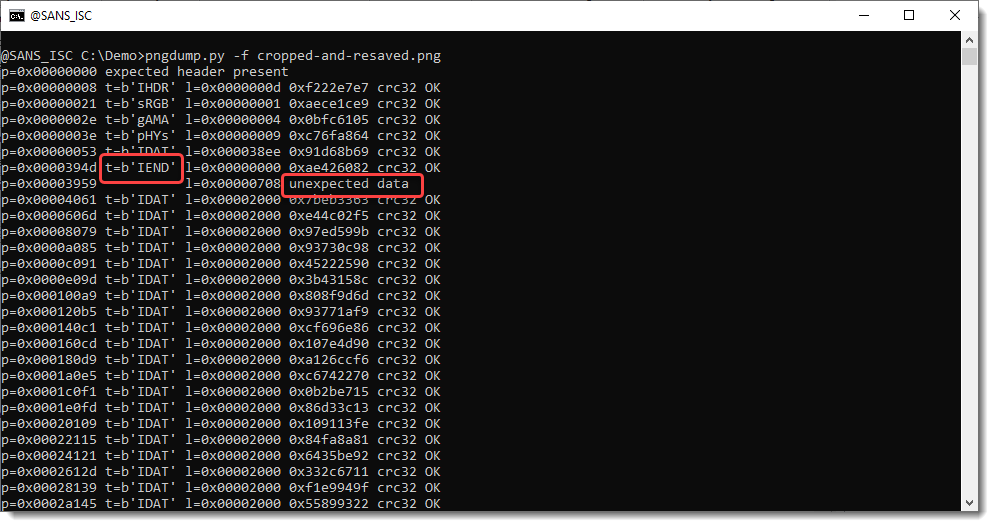
But with this new option, -f (--find), pngdump.py will scan any file you give it, for known PNG chunks, and report them:

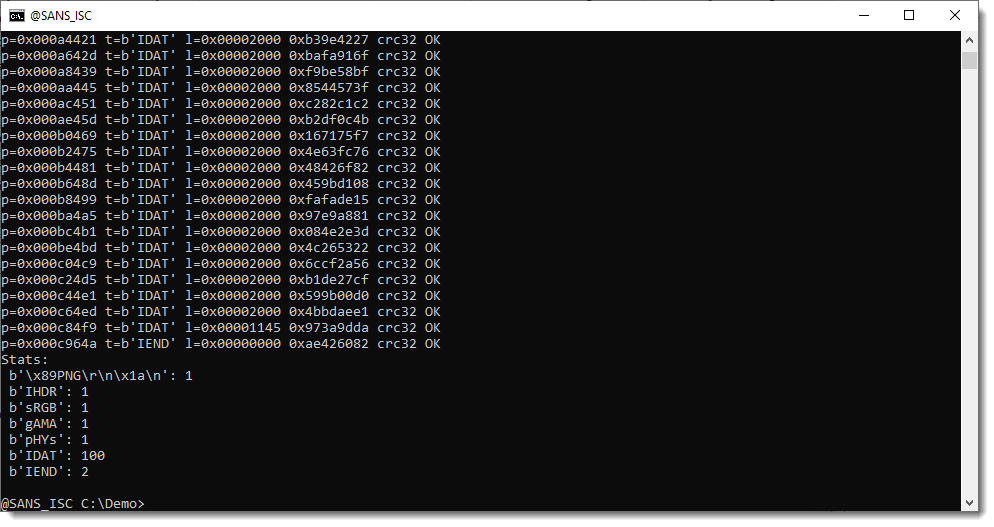
This time, pngdump.py also finds unexpected data after the IEND chunk, but then it also finds known chunks (IDAT chunks and another IEND chunk). The unexpected data is another IDAT chunk whose header has been overwritten, and can thus no longer be recognized. But after that corrupt chunk, pngdump finds intact chunks with its -f option:

At the end, pngdump also produces a small statistical overview. One can clearly see that there are 2 IEND chunks, and that is abnormal.
IDAT chunks contain the bitmap image compressed with ZLIB. With a bit of luck, one can decompress these extra IDAT chunks and reconstitute a partial image, as demonstrated by David Buchanan here.
Didier Stevens
Senior handler
Microsoft MVP
blog.DidierStevens.com


Comments
.PNG files can be searched with good old FIND command from the Windows Command Prompt.
C:\Scripts\Acropalypse>find /C "IEND" Acropalypse_BIG_SnipOverwrite.png Acropalypse_BIG__Original.png
---------- ACROPALYPSE_BIG_SNIPOVERWRITE.PNG: 2
---------- ACROPALYPSE_BIG__ORIGINAL.PNG: 1
You can also use PowerShell;
PS C:\Scripts\Acropalypse> Format-Hex .\Acropalypse_BIG__Original.png | Select-String -Pattern "00 00 49 45"
0000000000005740 00 00 49 45 4E 44 AE 42 60 82 IEND®B`�
PS C:\Scripts\Acropalypse> Format-Hex .\Acropalypse_BIG_SnipOverwrite.png | Select-String -Pattern "00 00 49 45"
0000000000001B80 00 00 49 45 4E 44 AE 42 60 82 E6 C1 DB 15 3D B0 IEND®B`�æÁÛ�=°
0000000000005740 00 00 49 45 4E 44 AE 42 60 82 IEND®B`�
For .jpg;
PS C:\Scripts\Acropalypse> Format-Hex .\Acropalypse_BIG_SnipOverwrite.jpg | Select-String -Pattern "FF D9"
0000000000004B70 2F 7F CB FA D3 4F 2A A2 8A 29 08 FF D9 77 7E 1F /�ËúÓO*¢�)�ÿÙw~�
0000000000018220 A2 8A 00 28 A2 8A 00 28 A2 8A 00 FF D9 ¢� (¢� (¢� ÿÙ
---
PowerShell oneliners to search recursively from your current folder, listing only files that have 2 or more end-of-file makers:
PS C:\Scripts\Acropalypse> foreach ($a in (get-childitem -Filter *.jpg -Name -Recurse)) { if ( (Format-Hex ./$a | Select-String -Pattern "FF D9").Matches.Count -ge 2 ) { write-host $a } }
Acropalypse_BIG_SnipOverwrite.jpg
subfolder1\Acropalypse_BIG_SnipOverwrite.jpg
PS C:\Scripts\Acropalypse> foreach ($a in (get-childitem -Filter *.png -Name -Recurse)) { if ( (Format-Hex ./$a | Select-String -Pattern "00 00 49 45").Matches.Count -ge 2 ) { write-host $a } }
Acropalypse_BIG_SnipOverwrite.png
subfolder1\Acropalypse_BIG_SnipOverwrite.png
dotBATman
Mar 23rd 2023
2 years ago
Remember: Responsible Disclosure! :)
dotBATman
Mar 23rd 2023
2 years ago
* Open a photo in the built-in Photos app (Microsoft.Photos.exe under current Windows 11)
* Go to the "..." menu and select "Resize"
* Select a small size
* In the "Save As" dialog box, select the original image file and click "Save"
* In the "Confirm Save As" dialog box, click "Yes"
* Note that the file retains its original byte count, but now has smaller dimensions.
Note that for resize this is less of a security issue since the new image has the same scope, just at lower resolution.
Note that cropping does not pose a problem - the following sequence will result in a significantly smaller file:
* Open a photo in the built-in Photos app (Microsoft.Photos.exe under current Windows 11)
* Click the "Edit image" button (4:3 rect with pencil) at the top
* Crop the image tightly
* Click the down arrow for "Save as copy" and select "Save"
dotBATman
Mar 25th 2023
2 years ago