Honeypots: From the Skeptical Beginner to the Tactical Enthusiast
[This is a Guest Diary by Nicolas Haney, an ISC intern as part of the SANS.edu BACS program]
Introduction
When I began setting up the DShield honeypot on my network, I was hesitant and extremely nervous. There were a lot of firsts for me here. First time using a raspberry pi, first time setting up a honeypot, and first time using port forwarding on my own home network. The DShield software and updated raspberry pi are safe enough, however there are some checks analysts can use for peace of mind. Once comfortable, analysts may look into improving their setup by introducing security controls and VM’s. While everyone’s set up is different, there are some fundamentals that most setups have in some form.
Benefits of a Honeypot
By installing a DShield honeypot at home, we are helping SANS Internet Storm Center (ISC) provide Threat Intelligence, Trend Analysis, and much more to other analysts across the globe.
There are several benefits to the analyst running the honeypot:
- Practice analyzing and researching unknown techniques.
- Practice using tools of their own choice.
- Practice writing reports in an understandable way.
- Knowledge of active attack campaigns.
- Professional Reputation building.
Quantitative Risk Assessment
The first step is to review the attack surface. We will be taking a look at externally visible ports and services with listening sockets.
A simple NMAP port scan from my kali machine will show that the only visible ports are those associated with the honeypot (2222, 2223, and 8000)
sudo nmap -sT <HONEYPOT IP>
Next, from within the honeypot, listing the listening sockets using the Socket Statistics command will show that on top of the three honeypot ports, there are the a few others:
sudo ss -tunlp

Reviewing the listening ports/services:
- UDP 5353. This is DNS and can’t be avoided.
- UDP 41215. This is being used by the DNS service and was present on a fresh install. Due to that fact, I am not concerned.
- TCP 12222. This may or may not show up depending if you are ssh’d into the pi. The DShield installation configures this. Personally, I do not have ssh started automatically. I’d prefer to enable ssh via the console once a week when I need to work with the pi.
- TCP 25. This is used by DShield as well. I would not be concerned.
- TCP 8443. This is used by the same python3 process that is hosting port 8000. As it is related to the honeypot and present on a fresh install of DShield, I am not concerned.
Running the following command on the raspberry pi will enable the analyst to view the firewall rules:
sudo iptables -t nat -L
Review of the iptables shows a DShield Chain and several redirects for the honeypot ports. There is nothing of concern in the rules.
An even more skeptical analyst would run a vulnerability scan internally against the Raspberry Pi. I used the NMAP vulners.nse script against the target, which did not provide any hits.
Honeypot Segmentation
How can we reduce the risk even more? Segmentation is the answer and it’s offered in a variety of ways.
The safest and simplest way may be physical segmentation, where the connections from the honeypot are totally separated from the connections of the rest of the network. This would be having all devices disconnected from the router when the honeypot is active. When I first started, I would only have the honeypot active during the day while I was at work. This method is quite tedious, however effective. I found myself forgetting to plug the Pi back in before work which resulted in much less traffic. I also have partial conversations in logs because I would unknowingly disconnect mid-attack. All-in-All, I do not recommend this method for a permanent honeypot.
Another option might be pausing a device. Pausing a device is blocking all outbound and inbound traffic across the firewall. A connection directly from my analysis computer and the Pi allowed me to perform the analysis.
The next form of segmentation are VLANs. My original router did not support VLANs, nor changing of the DHCP pool. This meant that my Pi was on the same IP space as my personal computer and all my wireless devices. I decided to buy a managed layer 2 switch from a local Best Buy. The VLAN configuration was as follows:

VLAN 1 is a management VLAN. This is the VLAN where I manage the Switch and a Server (More on this later).
VLAN 2 contains the port for the Pi (Port 8) and a port for my laptop (Port 5).
VLAN 8 contains the port for the Pi (Port 8) and a port for the internet (Port 7).
With this setup, all I need to do is manually unplug the internet (Port 7) whenever I need to ssh into the Pi, providing me with an improved sense of security.
Consuming Logs into ESXI VM
Now that I have a comfortable understanding of the attack surface and risks associated with my new honeypot, the next step is auditing and enrichment.
I set up my old Dell Server by installing ESXI on it. I followed up by creating an instance of Splunk. I set up port mirroring on my switch to mirror all traffic from port 8 (Pi port).
Brief Splunk Setup
I created a Windows 10 VM, installed Splunk using a free license and installed the necessary apps.
Because my Splunk server (and ESXI server) are in a different VLAN, it is necessary to install the following Splunk Apps in order to ingest the traffic:
- Splunk Stream
- Splunk Stream Add-on
- Splunk Stream Knowledge Objects for Wire Data
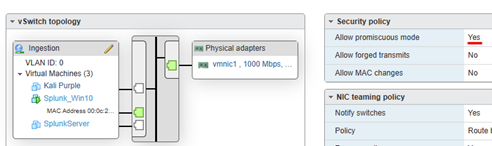
In ESXI, I set up a vSwitch named Ingestion and mapped the traffic coming from the switch mirror port to the 2nd ESXI port (vmnic1). Also it is necessary to set the virtual switch in promiscuous mode.
This configuration will provide basic netflow accessible in Splunk. You’ll want to filter out the DShield IP’s.
Aside from just visualizing the honeypot connections, a skeptical analyst might baseline all of the internal connections to/from the Pi and alert on anomalous connections. This includes monitoring outbound connections NOT sourced from the honeypot ports. (I have no data to show for this, which is a good thing!)
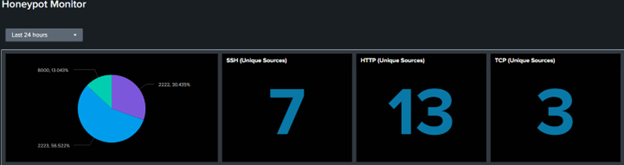
Now I have the power to customize a dashboard to my liking and display it on a monitor for my viewing pleasure:
Brief Syslog Setup
The next step is forwarding both cowrie logs and system logs to Splunk via rsyslog, which is already installed and used by DShield. While there are several methods to achieve this, I simply modified the /etc/rsyslog.conf file to include an arbitrary internal IP (because my Splunk instance is logically separated and all traffic is being mirrored from a span port to Splunk, my Splunk instance will merely accept any traffic to port 514 over UDP).
To edit the rsyslog config:
sudo nano /etc/rsyslog.conf
To add the destination syslog server:
*.* @192.168.10.20:514
Note: Because my Splunk server is logically separated and cannot communicate with the Pi, I used a single ‘@’ character which configures rsyslog to use UDP.
On the Splunk end, I needed to include the src_content and dest_content attributes for UDP netflow to ingest the Sysmon message.
This will forward the system logs from the Pi, however a tactical enthusiast would prefer to also include the cowrie logs. Despite my best efforts, I was unable to modify rsyslog to directly forward cowrie logs, however I did find another way.
Logger is already installed on the Pi. It is a tool that will add text to /var/log/syslog, which is configured by default to be forwarded to the given syslog server [1]. We will use logger on the cowrie.log file to have it forwarded with syslog. By modifying the cron file of your choosing, you can automate this:
echo "0 0 0 * * * cat /srv/cowrie/var/log/cowrie/cowrie.log | logger" > ForwardCowrieLogs
Note: In this example I am grabbing the cowrie SSH logs at midnight every day. Also you will need to be logged in root to run this command.
Conclusion
The DShield honeypot does not pose a significant risk to your home network. The only attack surface targetable from external entities consists of 3 ports forwarded externally. A skeptical analyst has several segmentation options to further secure their honeypot from the initial guidance provided by SANS ISC. The tactical enthusiast can make use of the network and host logs of the Pi by leveraging port mirroring and a SIEM, which provide meaningful visualizations and alerting options.
References:
[1] https://www.linux.com/news/how-use-logger-linux/#:~:text=The%20logger%20command%20provides%20an%20easy%20way%20to,added%20to%20the%20end%20of%20the%20%2Fvar%2Flog%2Fsyslog%20file
[2] https://www.sans.edu/cyber-security-programs/bachelors-degree/
-----------
Guy Bruneau IPSS Inc.
My Handler Page
Twitter: GuyBruneau
gbruneau at isc dot sans dot edu


Comments