Retro Hunting!
For a while, one of the security trends is to integrate information from 3rd-party feeds to improve the detection of suspicious activities. By collecting indicators of compromize[1], other tools may correlate them with their own data and generate alerts on specific conditions. The initial goal is to share as fast as possible new IOC’s with peers to improve the detection capability and, maybe, prevent further attacks or infections.
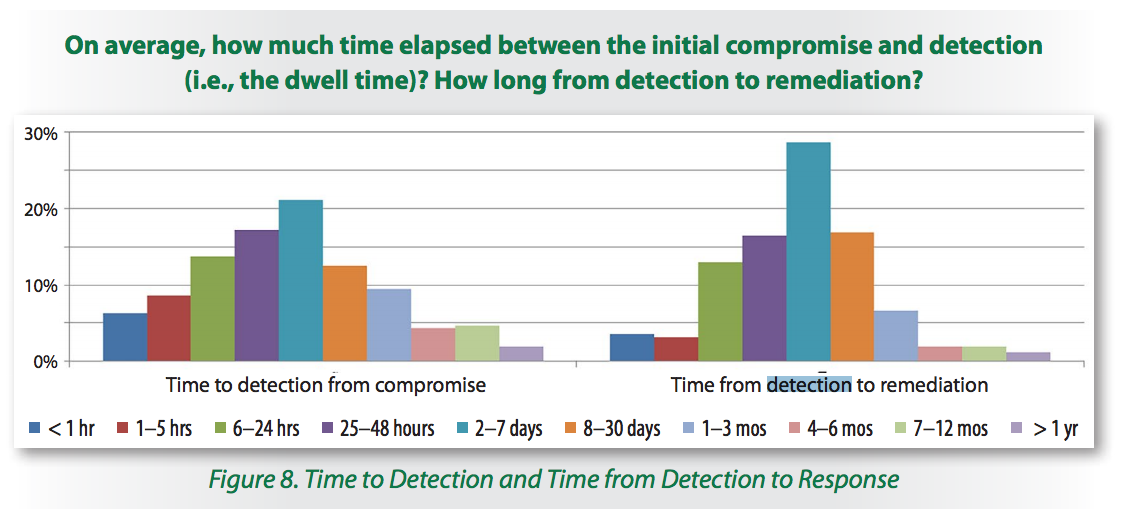
However, the 2016 SANS Incident Response Survey [2] demonstrated that, in many cases, the time to detect a compromise may remain important:

If your organization is targeted, there are few chances to see your malware sample analysed by security researchers and it may take some time to see new IOC’s extracted and distributed via classic channels. That’s why playing “retro hunting” is also important. I like this name: it comes from a VirusTotal feature that allows the creation of YARA rules and to search backwards for samples that match them. (Note: this is only available to paid subscriptions - VT Intelligence[3])
In the same philosophy, it’s interesting to perform retro-hunting in your logs to detect malicious activity that occurred in the past. Here is an example based on MISP and Splunk. The first step is to export interesting IOC’s like IP addresses, hostnames or hashes from the last day. Export them in CSV format into your Splunk via a simple crontab:
0 0 * * * curl -H 'Authorization: xxxxxx' -k -s \
'https://misp.xxx.xxx/events/csv/download/false/false/false/Network%20activity/ip-src/true/false/false/1d' | \
awk -F ',' '{ print $5 }'| sed -e 's/value/src_ip/g’ >/opt/splunk/etc/apps/search/lookups/misp-ip-src.csv

15 0 * * * curl -H 'Authorization: xxxxxx' -k -s \
'https://misp.xxx.xxx/events/csv/download/false/false/false/Network%20activity/hostname/true/false/false/1d' | \
awk -F ',' '{ print $5 }'| sed -e 's/value/qclass/g’ >/opt/splunk/etc/apps/search/lookups/misp-hostnames.csv
It is possible to fine tune the query and export IOC’s that really matter (TLP:RED, with or without this tag, …)
Now, lookup tables are ready to be used on Splunk queries. Exported data are for the last day, let’s focus on a larger time period like 30 days with a simple query:
index=firewall [inputlookup misp-ip-src.csv | fields src_ip]
Results show that we had some hits in the firewall logs a few days ago:

Now let's search for interesting hostnames in our Bro logs. Did we resolve suspicious hostnames?
sourcetype=bro_dns [inputlookup misp-hostnames.csv | fields qclass] | stats count by class

You can schedule those searches on a daily basis and generate a notification if at least one hit is detected. If it’s the case, it could be interesting to start an investigation.
Happy retro hunting!
[1] https://isc.sans.edu/forums/diary/Unity+Makes+Strength/20535/
[2] https://www.sans.org/reading-room/whitepapers/incident/incident-response-capabilities-2016-2016-incident-response-survey-37047
[3] https://www.virustotal.com/intelligence/
Xavier Mertens (@xme)
ISC Handler - Freelance Security Consultant
PGP Key
| Reverse-Engineering Malware: Advanced Code Analysis | Amsterdam | Mar 16th - Mar 20th 2026 |


Comments
Anonymous
Mar 15th 2017
8 years ago
Of course, there are many tools to automate this process... Use your preferred one! ;-)
Anonymous
Mar 15th 2017
8 years ago
In your MISP implementation, go to the Automation page. On that page, you will find your Authorization key. That is what he uses in his -H statement.
Next, read the documentation on that Automation page regarding csv exporting for how he creates the uri and what all the options mean. This will help you understand why he uses .../false/false/etc... and what you can change your uri to so that you get the data you want to import.
Anonymous
Jun 29th 2017
8 years ago